Electrometer Developer Guide
The Electrometer is a standard salobj CSC. It communicates over ethernet, but using a serial-to-ethernet converter.
Device Setup
The electrometer uses an RS-232 serial connection as it’s primary communication method. It is connected to a Moxa Nport 5110 ethernet to serial converter, which is what the CSC connects to.
We use the following serial connection settings:
Baud Rate = 57.6 K
Flow control = XON/XOFF
Terminator = <CR>
Parity = None
Stop bits = 1
Electrometer
Important
The RS-232 serial connection between the electrometer and moxa converter requires a straight-through male/female cable, and not a null modem connection. Cable lengths should be minimized.
The electrometer and photodiode documentation is found on Docushare. The devices must also have their serial/RS-232 communications configured to the proper parameters. Directions on how to do so for the electrometer are found on page X of the user manual. The parameters which must be set are:
Baud Rate = 57.6 K
Flow control = XON/XOFF
Terminator = <CR>
Moxa Serial-to-Ethernet converter
The moxa Nport 5110 manual is on Docushare.
Setting up these devices for the first time is a bit tricky, follow the steps closely.
Request a DHCP IP reservation from IT corresponding to the MAC address on the back of the device.
Plug in to network and connect to a power source. The moxa device will try to connect to 192.168.127.XX (see address on the back of device). On the office network, nothing will ping the device and therefore it will not report anything back and therefore will not receive an IP automatically and therefore will look like it can’t communicate. This is because there is no device on the same subnet.
From a device on the same network (running linux), add a second IP:
sudo ip a add 192.168.127.10/24 dev eth0Then ping the entire subnet.
ping 192.168.127.254This will make it such that the moxa device comes online, but with a 192.168.127.254 IP address.On the same device you used to ping it, open a web browser and navigate to:
192.168.127.254/main.htmThen login to the web-API and the device settings can be applied.The basic settings can be left as the defaults, as shown in the following figure, but a name can be added if desired.

Figure 1 Adding a name is optional, but recommended.
The serial settings should be as follows, and as shown in the following figure. - baud 57.6k, data bits 8, stop 1, parity non, FIFO enabled, flow ctrl xon/off, interface rs-232
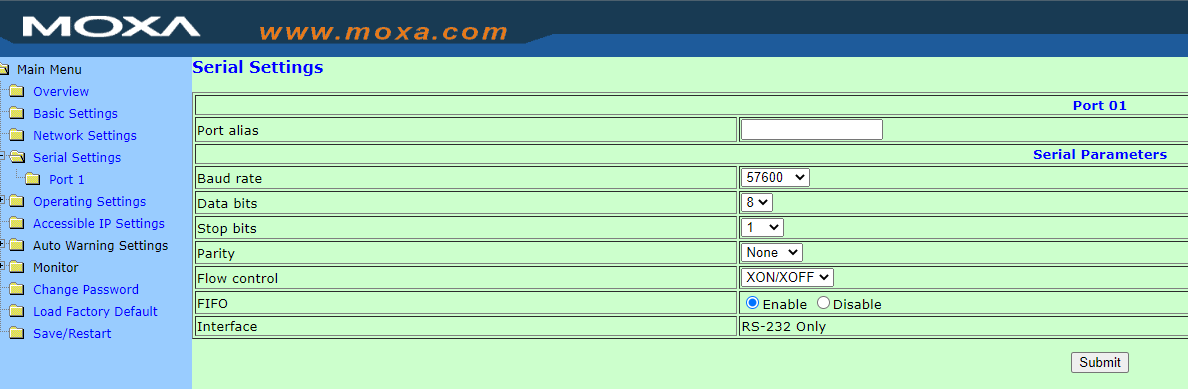
Figure 2 The serial settings must match the electrometer settings.
Important
Before continuing, make sure to have a reserved IP from IT for the Moxa’s MAC address.
The network settings should be in TCP server mode, with the default settings:
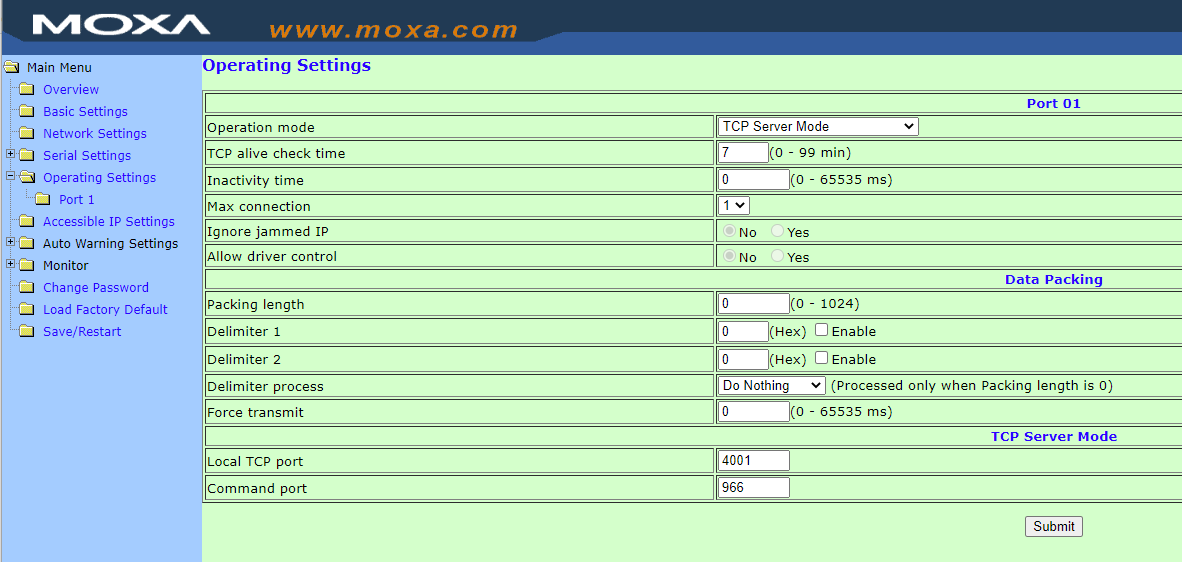
Figure 3 The default mode is not TCP Server, and therefore must be changed on initial setup.
The network settings should use DHCP, with the following settings:
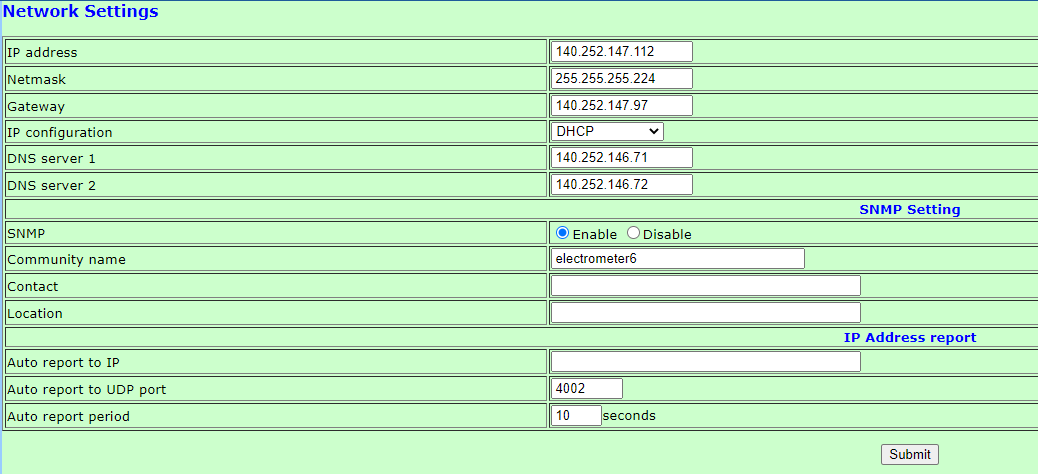
Figure 4 When the IP configuration is set to DHCP, and the setting is saved, the device will reset and automatically populate the gateway, netmask and others, also grabbing the assigned IP.
Once the electrometer is configured, the following code can be used to verify functionality.
import socket
import time
HOST="140.252.147.109"; PORT=4001
s=socket.socket(socket.AF_INET, socket.SOCK_STREAM)
s.connect((HOST, PORT))
time.sleep(0.5)
# After the following command, a "REM" will appear on the electrometer LED screen.
s.sendall(f'*idn?\r'.encode())
# Pause here to ensure all data gets written to the buffer
time.sleep(0.5)
data=s.recv(1024*2)
print(f'data is: {data}')
This should return:
b'KEITHLEY INSTRUMENTS INC.,MODEL 6517B,4114292,A13/700x \r'
Dependencies
Electrometer API
The content in this section is autogenerated from docstrings.
lsst.ts.electrometer Package
Functions
Classes
|
The type of average filters. |
|
Class that provides high level control for electrometer. |
|
Class that implements the CSC for the electrometer. |
|
|
|
The type of filters |
Class that formats commands to control the electrometer via RS-232. |
|
|
Class that provides high level control for the Keithley electrometer. |
Class that formats commands to control the electrometer via RS-232. |
|
|
Class that provides high level control for the Keithley electrometer. |
|
Implements a mock server for the electrometer. |
|
The type of data reading. |
|
Controls the source setting for triggering data to the buffer. |
|
The units for the electrometer. |
Build and Test
setup -kr .
scons
alternatively
pip install .[dev]
pytest --cov lsst.ts.electrometer -ra
Usage
RunElectrometer.py 1
Simulator
There is a basic simulation mode. Its mostly meant for unit testing the CSC.
Updating Firmware of the Electrometer
The firmware for the electrometer is not updatable.
Building the Documentation
It is assumed that the user is inside the develop-env container. The following command will build a local copy of the documentation.
package-docs clean && package-docs build
Contributing
Code and documentation contributions utilize pull-requests on github.
Feature requests can be made by filing a Jira ticket with the ts_electrometer label.
In all cases, reaching out to the contacts for this CSC is recommended.